

In this tutorial, you will learn how to create a password generator for secure login passwords, access passcodes and/or redeemable codes using HTML, CSS, JavaScript and PHP. We’ll start off with a simple barebones solution using only HTML and JavaScript, then proceed to a more advanced solution that also includes CSS and PHP. Now then, let’s code!
To begin, open your favorite code editor. If you’re new to programming, I highly recommend using Visual Studio Code – a free and customizable code editor developed by Microsoft.
Barebones Using only HTML and JavaScript
With your code editor opened, create a new file and save it as pass.html. Add the following HTML code to create the necessary controls for your password generator.
<div id="password"></div>
<input type="number" id="lengthValue" min="5" max="255" value="28">
<div class="value checkboxes">
    <input type="checkbox" id="char1" value="lowercase" checked>
    <label for="char1">lowercase</label>
    <input type="checkbox" id="char2" value="uppercase" checked>
    <label for="char2">UPPERCASE</label>
    <input type="checkbox" id="char3" value="numeric" checked>
    <label for="char3">Numbers (12345...)</label>
    <input type="checkbox" id="char4" value="symbol" checked>
    <label for="char4">Symbols (!&#@...)</label>
</div>
<button id="btnPGen" onclick="genPass()">Generate Password</button>
Save and open the file in your web browser to see the results. These controls include an empty DIV to display the generated passwords, a number field to determine the password’s length, a series of checkboxes to specify the characters allowed, and a button to trigger the password generation process.
As they are now, the controls don’t really do anything useful. To give them functionality, add the following JavaScript below your HTML code. Save it, then refresh your browser.
<script>
    function getElem(id) {
        return document.getElementById(id);
    } // USED TO AVOID REPETITIVE USE OF "document.getElementById"
    function genPass() {
        let length = getElem("lengthValue").value;
        let chars = "";
        let char1 = getElem("char1");
        let char2 = getElem("char2");
        let char3 = getElem("char3");
        let char4 = getElem("char4");
        // DETERMINE CHARACTER TYPES AND INCLUDE APPROPRIATE CHARACTER SET IN "MASK"
        if (char1.checked) {
            chars += 'a';
        }
        if (char2.checked) {
            chars += 'A';
        }
        if (char3.checked) {
            chars += '#';
        }
        if (char4.checked) {
            chars += '!';
        }
        let mask = '';
        if (chars.indexOf('a') > -1) mask += 'abcdefghijklmnopqrstuvwxyz';
        if (chars.indexOf('A') > -1) mask += 'ABCDEFGHIJKLMNOPQRSTUVWXYZ';
        if (chars.indexOf('#') > -1) mask += '0123456789';
        if (chars.indexOf('!') > -1) mask += '!@#$%^&()_+-=[]?'; // ~`!@#$%^&*()_+-={}[]:";\'<>?,./|\\   ALL ORIGINAL SYMBOLS
        let result = '';
        for (let i = length; i > 0; --i) result += mask[Math.floor(Math.random() * mask.length)];
        getElem("password").innerHTML = result;
    }
</script>
THAT’S IT! You now have a functional and secure password generator that looks like this:

No worries, a little CSS magic will make it look cuter than a baby hugging kittens… or close enough. Now, then, let’s create a more advanced [looking] password generator.
Advanced Using HTML, CSS, JavaScript, and PHP
For this method, since we’ll be using PHP (a server-side scripting language), you’re going to need a server to properly run the program. If you already have a remote server (website hosted by GoDaddy, HostGator, etc.) that supports PHP, then feel free to use it for this project. If you don’t have a remote server or have one but don’t want to use it, then you will need to download and install a free local server on your computer. There are several options to choose from, but two of the most popular are XAMPP and WampServer. Be sure the services of your local server are running before you proceed.
To begin, with your code editor opened, create two new files and save them as pass.php and hash.php respectively. In the pass.php file, add the following PHP code to instantiate two PHP variables that will be used later. Be sure to save your files after every step.
<?php
$passMD5 = $passSHA256 = '';
?>
In the hash.php file, add the following PHP code to handle HTTP requests that will be sent to it later using JavaScript.
<?php
if (isset($_REQUEST["q"])) {
    $q = $_REQUEST["q"];
    if ($q !== "") {
        $passMD5 = md5($q);
        $passSHA256 = hash("sha256", $q);
        echo $passMD5 . '::' . $passSHA256;
    }
}
?>
Going back to the pass.php file, add the following HTML code below the previously added PHP code. This will create a simple HTML page with all the necessary controls. Additionally, it links the web page to two external files (CSS and JavaScript) that we’ll create later.
<!DOCTYPE html>
<html lang="en">
<head>
    <meta charset="UTF-8">
    <meta http-equiv="X-UA-Compatible" content="IE=edge">
    <meta name="viewport" content="width=device-width, initial-scale=1.0">
    <title>PassGen by HakeemBey.com</title>
    <link rel="stylesheet" href="style.css">
</head>
<body>
    <div class="passInfo">
        <div>
            <div class="label">Password:</div>
            <div class="value"><input type="text" id="password"></div>
        </div>
        <div>
            <div class="label">MD5 Hash:</div>
            <div class="value"><input type="text" id="md5hash" disabled></div>
        </div>
        <div>
            <div class="label">SHA256:</div>
            <div class="value"><input type="text" id="sha256hash" disabled></div>
        </div>
        <div>
            <div class="label">Length:</div>
            <div class="value"><input type="number" id="lengthValue" min="5" max="255" value="28"></div>
        </div>
        <div>
            <div class="label">Characters:</div>
            <div class="value checkboxes">
                <input type="checkbox" name="char1" id="charAlphaLower" value="lowercase" checked>
                <label for="charAlphaLower">lowercase</label>
                <input type="checkbox" name="char2" id="charAlphaUpper" value="uppercase" checked>
                <label for="charAlphaUpper">UPPERCASE</label>
                <input type="checkbox" name="char3" id="charNumeric" value="numeric" checked>
                <label for="charNumeric">Numbers (12345...)</label>
                <input type="checkbox" name="char4" id="charSymbol" value="symbol" checked>
                <label for="charSymbol">Symbols (!&#@...)</label>
            </div>
        </div>
    </div>
    <button id="btnPGen" onclick="genPass()">Generate Password</button>
    <div class="history">
        <div class="labels">
            <div>Password</div>
            <div>MD5 Hash</div>
            <div>SHA256 Hash</div>
        </div>
        <div class="values" id="histValues"></div>
    </div>
    <script src="main.js"></script>
</body>
</html>
Now, let’s add a little styling to the page so it’s not a total eyesore. Create a new file and save it as style.css. Add the following CSS code to this file, save it, then refresh your browser.
button{padding:10px;cursor:pointer;margin:10px 0;}
input{width:90%;padding:10px;border:1px solid rgba(0,0,0,0.1);}
.label{font-weight:bold;}
.checkboxes{display:grid;grid-template-columns:repeat(12, auto);}
.labels,.histRow{display:grid;grid-template-columns:220px 200px auto;}
.labels{font-weight:bold;text-align:center;border-bottom:1px solid #FF0000;}
.values{font-size:0.7rem;text-align:center;}
.histRow{padding:5px 0;}
.histRow:nth-child(even){background-color:#EEE;}
.histRow:nth-child(odd){background-color:#CCC;}
At this stage, your password generator page should be looking a lot better, but it currently has no functionality. For this, create a new file and save it as main.js, then add the following JavaScript code, save it, then refresh your browser.
function genPass() {
    let length = getElem("lengthValue").value;
    let chars = "";
    let char1 = getElem("charAlphaLower");
    let char2 = getElem("charAlphaUpper");
    let char3 = getElem("charNumeric");
    let char4 = getElem("charSymbol");
    // DETERMINE CHARACTER TYPES AND INCLUDE APPROPRIATE CHARACTER SET IN "MASK"
    if (char1.checked) {
        chars += 'a';
    }
    if (char2.checked) {
        chars += 'A';
    }
    if (char3.checked) {
        chars += '#';
    }
    if (char4.checked) {
        chars += '!';
    }
    let mask = '';
    if (chars.indexOf('a') > -1) mask += 'abcdefghijklmnopqrstuvwxyz';
    if (chars.indexOf('A') > -1) mask += 'ABCDEFGHIJKLMNOPQRSTUVWXYZ';
    if (chars.indexOf('#') > -1) mask += '0123456789';
    if (chars.indexOf('!') > -1) mask += '!@#$%^&()_+-=[]?'; // ~`!@#$%^&*()_+-={}[]:";\'<>?,./|\\   ALL ORIGINAL SYMBOLS
    let result = '';
    for (let i = length; i > 0; --i) result += mask[Math.floor(Math.random() * mask.length)];

    // SEND GENERATED PASSWORD TO PHP SCRIPT FOR HASHING
    var xmlhttp = new XMLHttpRequest();
    xmlhttp.onreadystatechange = function() {
        if (this.readyState == 4 && this.status == 200) {
            let hashArr = this.responseText.split("::");
            let md5Hash = hashArr[0];
            let shaHash = hashArr[1];
            let histVal = getElem("histValues");
            getElem("password").value = result;
            getElem("md5hash").value = md5Hash;
            getElem("sha256hash").value = shaHash;
            histVal.innerHTML += '<div class="histRow"><div>' + result + '</div><div>' + md5Hash + '</div><div>' + shaHash + '</div></div>';
        }
    };
    xmlhttp.open("GET", "hash.php?q=" + result, true);
    xmlhttp.send();
}
function getElem(id) {
    return document.getElementById(id);
} // USED TO AVOID REPETITIVE USE OF "document.getElementById"
Click the “Generate Password” button. THAT’S IT! Your password generator should now be fully functional and looking like this:
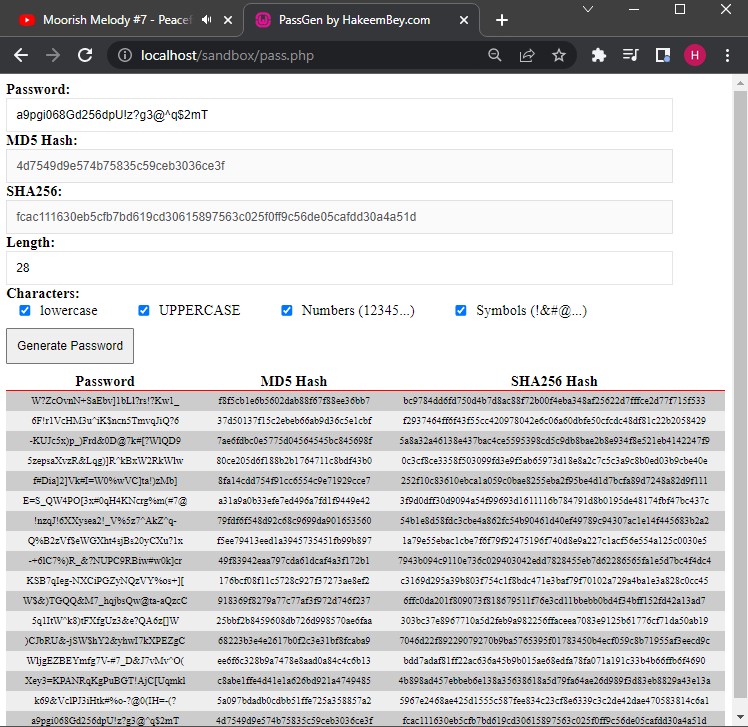
Every time you click the button, a new password will be generated along with its MD5 and SHA256 hashes. These data points are added to the temporary history list at the bottom of the page. Play around with the character types and length control options until it generates your desired passcode(s).
Known Bugs
One notable flaw with this is a bug that occurs when the generated password starts with an ampersand (&) or a number (#) sign. When this happens, the MD5 hash returns an empty string and the SHA256 hash returns undefined. A minor issue corrected by generating a new password.
If you found this tutorial helpful, share it with friends and consider subscribing to the monthly newsletter to get instant updates when new tutorials like this one are posted.